Sit Spot & Nature Awareness: How to See More Wildlife
A sit spot practice is simple: you pick one place outdoors, close to home, and return to it again and again to sit quietly and observe. Within a few visits you notice birds, tracks and sounds you walked past before, and you learn how a place changes with the weather, the time of day and the season. It is the cheapest way to train nature awareness and the best answer to "how do I see more wildlife?".
This guide shows how to choose and sit at a spot, the awareness exercises that make the difference (wide-angle vision, listening, sound maps, bird language basics), how to move quietly with the fox walk, and how to keep a nature journal without disturbing animals. The same attention feeds tracking, natural navigation and reading the weather – and it is a core habit of every good bushcrafter.
Step by step
-
1

Choose a spot close to home
Pick a safe place you can reach in 5–10 minutes, with a tree at your back and a view of open ground. Stay off game trails and away from dens and nests.
-
2

Arrive slowly and settle
Walk in slowly, sit down and stay still. Birds go quiet when you arrive; when they start singing again, you have become part of the scene.
-
3

Use wide-angle vision
Look at one point with a soft gaze and let your attention spread to the edges of your view. Movement there is what you notice first.
-
4

Listen like a deer
Cup a hand behind your ear, close your eyes and turn slowly. Note what you hear and from which direction.
-
5

Move quietly
Use the fox walk: lift each foot, place the ball of the foot first and shift your weight only when the ground holds. Keep the wind in your face.
-
6

Write it down
Note the date, weather, sounds and animals, and sketch a small map. After a few weeks your journal shows patterns you cannot see in one visit.
What is a sit spot and why does it work?
A sit spot is a regular, familiar place where you do nothing except sit and pay attention. It can be a log at the edge of a wood, a bench-sized patch of grass at the back of a park, a tree stump by a field or the corner of your own garden. What matters is not the place but the repetition: the more often you sit there, the more the place reveals.
The idea is old and simple. Animals treat a person who walks through as an alarm, and everything goes quiet for a hundred metres. A person who sits still, repeatedly, in the same spot becomes part of the background, and the usual life of the place resumes. That is when you see the things walkers never see.
What it trains
- Attention and patience: staying with one place for twenty minutes teaches you to notice small changes instead of scanning for something "big".
- Tracking: you learn where animals pass, at what time and what they leave behind – the base for reading tracks and signs.
- Navigation: sun, wind, shadows and the shape of the land become familiar, which is the groundwork for navigating without a compass.
- Safety: you notice weather changes earlier – see reading weather signs – and you become aware of your surroundings, which helps on every trip.
How to choose a sit spot
The best sit spot is the one you will actually visit. That usually means a place you can reach in 5–10 minutes from your door, so that bad weather and a busy day do not become excuses. Look for a spot with variety: an edge between open ground and trees, a hedge, a stream bank or a clearing, because edges attract more life than the middle of a uniform forest.
Checklist for a good spot
- Legal access: sit only where you are allowed to be. Rules on private land, nature reserves and protected areas differ by country and region – check locally before you settle in.
- Safe: no dead branches overhead, no steep bank or water edge you could slip from, no busy road behind you. Tell someone where you are going, as with any outing – see trip planning.
- Back to something: a tree trunk, a boulder or a bush behind you breaks your outline and lets you relax.
- Open view in at least one direction: a meadow edge, a path or a stretch of water gives you something to watch.
- Away from game trails, dens and nests: if you sit on an animal route, you block it. Fresh tracks in a narrow gap, flattened tunnels through undergrowth, holes in the ground or a busy nest are signs to move on. See wildlife encounters for how animals use the land.
- Some sound and some shelter: a place that is not completely silent and not completely exposed, so you have something to listen to and something to lean on.

Breeding season and disturbance
In spring and early summer many animals have young. Birds sit on nests, young deer lie hidden in grass and other species keep their dens. Disturbance at that time can be harmful, and in Germany such periods are often called Brut- und Setzzeit. Rules about leaving paths, keeping dogs on leads and entering sensitive areas can apply in nature reserves and woodland, and they differ between regions and countries. This guide gives no legal advice: check the rules for the land where you sit, and when in doubt choose a spot beside an established path, a garden or a park rather than deep in cover.
How to sit: arrival, settling and stillness
The first ten minutes decide what you will see. Everything you do on arrival sends a message to the animals nearby, so make it a calm one.
Arrive slowly
Walk the last 50 metres slowly, without talking and without sudden movements. Stop for a moment at the edge of your spot and look and listen before you step in. Then walk to the same seat as last time and sit down in one smooth motion. A small foam seat pad keeps you dry and warm and lets you sit longer.
Settle in
Expect the birds to fall silent when you arrive. That is the alarm you set off. Stay still. After roughly 10–15 minutes the usual sounds come back, and this is the moment the sit spot starts: you are now part of the scene. Use that time to relax your shoulders, breathe slowly and let your eyes soften. Do not check your phone: the light gives you away.
Stillness without strain
- Sit comfortably so you can stay put: back supported, knees relaxed, hands in your lap.
- If you must move, do it very slowly and only when nothing is looking your way.
- Keep your face low in the light and avoid pointing; slow small movements are far less noticeable than fast big ones.
| Season | What to wear | Why it matters |
|---|---|---|
| Spring / autumn | Wool or fleece mid layer, windproof shell, hat, seat pad | Sitting cools you much faster than walking; the ground steals heat |
| Summer | Long trousers and sleeves in muted colours, light hat | Protects against insects and ticks and does not flash in the light |
| Winter | Insulated layers, warm hat, gloves, insulated seat pad | You are not moving; build in more insulation than for a hike |
| Any season | Quiet fabrics (no rustling nylon), earth tones, no strong scents | Noise, bright colours and perfume carry further than you think |
Details on layering in bushcraft clothing. Cold sessions: check the wind chill before you go.
The common mistake is to dress for the walk to the spot and then sit in the same clothes. If you start to shiver, stand up slowly, walk home and warm up – cold is a safety issue, not a test. The signs and first aid are explained in hypothermia and cold injuries.
Awareness exercises: owl eyes, deer ears and sound maps
You can simply sit and see what comes, but a few exercises train your senses faster. Do one per visit and rotate through them. They work for children and adults alike.
Wide-angle vision: owl eyes
Most people look at the world as a narrow tunnel, staring at one thing. Humans can instead use peripheral vision, which is very good at detecting movement even though it is poor at detail. Wide-angle vision, often called "owl eyes", means relaxing the focus on one point and letting your attention expand to the whole visual field. When something moves at the edge, you turn your head slowly and look at it.
Wide-angle vision in four steps
 1Notice your tunnel
Stare hard at one point for ten seconds. Notice how little you see around it – movement at the sides goes unnoticed. This is what most people do all the time.
 2Soften the gaze
Pick a point about 10–20 metres away, stay on it and relax your eyes and face. Let your attention spread left and right without moving your eyes. Hold it for a few minutes.
 3Test your edges
Hold your hands out to the sides, just inside your view, and wiggle your fingers. You should notice the movement without looking at it. Slowly widen until you barely notice it – that is your edge.
 4Turn your head, not just your eyes
When something moves at the edge, turn your head slowly towards it. Fast eye or head movement is what animals notice; slow turns stay below their alarm threshold.
What it should look like: after a few minutes of soft gaze the whole scene looks calmer, colours seem flatter and anything that moves – a bird, a leaf, an ear – jumps out. If you get a headache, you are straining: relax your face and blink.
Deer ears: listening
Animals hear far better than you expect, and you can improve your own listening too. Cup a hand behind each ear to collect sound – like a deer turning its ears – or hold both hands curved forward. Close your eyes for a minute, turn your head slowly in a circle and note where sounds come from. The shape of the sound tells a story: a steady rustle is wind, an irregular scrabble in leaves may be a small animal, a crack of a twig means weight.
The sound map
A sound map is the single best exercise for beginners. It turns hearing into a picture and shows you how much was around you all along.
Draw a sound map
 1Mark yourself
Draw a small X in the middle of a page. This is you. The top of the page is the direction you face – keep it the same each time.
 2Listen all around
Close your eyes and listen for 3–5 minutes. Do not draw yet. Turn your head slowly so you hear front, sides and back.
 3Mark each sound
Open your eyes and draw short symbols where each sound came from: notes for birdsong, a wavy line for wind in the leaves, dashes for a twig. Make near sounds close to the X and far sounds near the edge.
 4Repeat and compare
Next week draw a second map at the same time of day. Compare: what is new, what is missing, what has moved? Changes are the interesting part.
Noticing baseline and disturbance
The most important concept in nature awareness is the baseline: the normal pattern of sounds and movement in a place. When you know the baseline, you notice instantly when it changes – birds stop singing, a squirrel freezes, a flock lifts off. A disturbance means something is happening: a predator, a person, a dog, weather, or perhaps you. Learning to ask "what changed?" is the whole skill.
A good habit is to note the baseline in your journal at the start of each visit in one line – for example "wind light, two songbirds, distant traffic" – and then record every change, with the time.
Bird language basics: song, calls and alarms
Birds are the neighbourhood's alarm system. You do not need to identify species to use them: even a beginner can learn to hear the difference between a relaxed bird and a worried one, and that already tells you when something is nearby.
- Song: usually longer, repeated phrases from a bird perched in the open. In general, it means the bird feels safe enough to be loud.
- Contact calls: short, soft calls between birds as they feed and move. Many birds together chattering calmly is a good baseline.
- Alarm calls: often sharper, harsher and repeated, sometimes sudden and loud. A bird may fly to a high perch, look in one direction and keep calling. Several species may join in.
- Silence: a sudden, widespread silence also means something. It can be a bird of prey passing or a person arriving.

A simple routine
- Note the baseline: how many birds, how loud, how relaxed.
- When the pattern changes, do not move. Note the time and the direction the birds face.
- Look in that direction with soft vision and wait.
- Write down what you saw – even "nothing" – and what you think it was.
Be honest about uncertainty: alarm calls have many possible causes, so treat them as a clue to follow with your eyes, not as proof. A regional field guide helps you learn a few local songs over time.
Moving quietly: fox walk and stalking
The sit spot teaches you to be still; moving quietly teaches you to travel without raising the alarm. The core technique is the fox walk, also called the stalking walk. The exact details vary a little between teachers, but the principle is always the same: move slowly, keep your weight back, and feel the ground before you commit.
The fox walk step by step
Fox walk in five steps
 1Stance
Stand with soft knees, a straight back and your eyes up and wide. Keep your arms relaxed and your steps shorter than normal. Head up, so you see what is ahead, not just the ground.
 2Lift and feel
Lift the leading foot high and let the toes feel for what is under them. Dry twigs, loose stones and crunchy leaves are what you want to avoid; sweep them aside slowly with the side of your boot if needed.
 3Place the ball of the foot
Lower the outer ball of the foot first, and feel the surface. If it is quiet and stable, continue. If a twig is under you, lift and try again; do not press down.
 4Roll down slowly
Roll the foot down slowly from the ball to the heel, keeping most of your weight on the back foot. Your front foot is still only testing.
 5Shift your weight
Only when the front foot feels safe, shift your weight across and lift the other foot. Pause often, look around with wide-angle vision and listen.
Practise on a lawn first, then on forest litter, in boots with a flexible sole. It is slow: 50 metres can take ten minutes. That is intended.
Stalking: getting closer without being noticed
Stalking is the fox walk with a goal: to watch an animal from a respectful distance, not to touch or approach it. A few rules make it work:
- Move only when the animal is not looking. Freeze when it lifts its head and wait until it goes back to feeding or resting.
- Use cover: keep trees, bushes and the lie of the land between you and the animal.
- Stay low: a crouch or a slow crawl breaks your outline.
- Stop earlier than you want to. A watching animal that does not change its behaviour is a success. The moment it starts to look at you, stop and back away.
Wind and scent: stay downwind
Many animals smell far better than they see. If the wind carries your scent to them, no amount of quiet walking will help. The rule is simple: keep the wind in your face when you approach an animal, so that your scent is blown away from it.
A simple wind test
Pick a few blades of dry grass, a pinch of dry dust or a light feather, hold it at shoulder height and let go. The direction it drifts shows where the wind is going. Another method is to wet a finger: the side that feels cool faces the wind. Check every few minutes, because the wind in woodland swirls and changes direction.

Wind matters for the sit spot too: choose a seat where the wind blows from the place you want to watch towards you, or from the side. Note the wind in your journal; for more, see reading weather signs.
Keeping a nature journal
A journal turns single visits into knowledge. You do not need to draw well: simple notes, a stick-figure sketch and a map are enough. Keep it brief so you can focus on the place rather than the paper.
- Date, time, weather: temperature feeling, wind, cloud cover, last rain.
- Baseline: one line on what was normal when you arrived.
- Sound map: a small drawing, as above.
- Sightings: animals, tracks, signs, plants in flower, anything that was new.
- Changes: what is different from last time – the "what changed?" question.
- One question: something you want to find out next time.

Maps and sketches
Draw a map of your sit spot from above: your seat as an X, big trees, paths, rocks, water and anything permanent. Add a north arrow. Over time you can mark where you saw a particular animal or where a bird always lands. If you want to link this with real maps, our guide to map and compass navigation shows how to read the land.
Seasons and times of day
The same spot is a different place at dawn, at noon and at dusk, and in each season. That is the reward of repetition. Many animals are most active around dawn and dusk, so these are the best times for wildlife; the daylight calculator tells you when they happen where you live. But also visit at midday and in bad weather: you learn what animals do when you least expect it.
| Season | What changes | Good exercises |
|---|---|---|
| Spring | Birdsong builds up, buds open, many animals have young | Sound map, baseline notes; keep extra distance from nests and young |
| Summer | Long light, insects, heat at midday | Dawn and dusk sits; check for ticks; note insect and bird activity |
| Autumn | Leaves fall, seeds and nuts ripen, rutting calls from some deer | Wide-angle vision in low light; note who feeds on what |
| Winter | Bare trees, long views, snow shows trails | Short warm sessions; read tracks in fresh snow, see tracking |
Dawn and dusk
Arrive in the dark or half-light, settle before the first birds sing and watch the day begin – or arrive in the late afternoon and stay until the light fades. On clear evenings, wait for the first stars too: see stars and the night sky at camp. Bring a headlamp for the walk home. Our guide to night skills explains how eyes adapt to darkness; avoid unfamiliar terrain in the dark.
Sit spot games with children
Children are natural observers, but not natural sitters. Turn the exercises into games with short rounds, and sit with them – do not just supervise. Our guide to bushcraft with kids has more nature games.
- Sound map race: everyone draws a sound map for three minutes. Who found the most sounds? Who found the farthest?
- Owl eyes: sit in a circle and wiggle fingers at the edge of view, as in the exercise above. Who can see the fingers without turning?
- Silent minute: a one-minute challenge to sit as still as a rock. Increase slowly, with no fixed goal of more than five minutes at first.
- Blind walk with a partner (safe version): one child walks with eyes closed or a scarf over the eyes, led gently by the hand over flat, clear ground by a partner. Walk at a slow pace, warn about every step and swap roles. Avoid water, roads, slopes and anything with sharp edges, and stay close.
Ethics: observe without disturbing
Sit spot practice is about learning from wildlife, never at its expense. These principles keep the place healthy and the animals unstressed:
- Keep your distance. If an animal changes its behaviour because of you – stares, stops feeding, moves away – you are too close. Back off slowly.
- Do not bait or feed. Food attracts animals to places where they should not be, changes their behaviour and can harm them. Watch what comes naturally.
- Leave nests, dens and young alone. If you find a nest, fawn or fledgling, leave quietly and do not touch it. Young animals are usually not abandoned, even if they look alone.
- Take photos from a distance. Use a zoom lens, no flash and no approach for the shot.
- Dogs: a dog changes everything. Dogs scare wildlife and can chase or harm it. In most areas dogs must be kept on a lead, especially during the breeding season – check the local rules. A calm dog on a short lead may be possible at some sit spots, but never at a place with ground-nesting birds or young animals.
Ticks and practicalities
Sitting still in grass and undergrowth is exactly what ticks like. In regions where ticks are common, take sensible precautions: long trousers (tucked into socks if you sit in tall grass), closed shoes and a quick body check at home. Remove any tick as soon as you find it – our guides on ticks and insects and first aid explain how – and watch the bite site in the following weeks.
What to bring
Sit spot kit
- Foam seat pad or small folding stool
- Warm layer and windproof jacket, even in summer
- Notebook and pencil in a zip bag (pencil works when wet)
- Small flask with a warm drink in cold weather
- Pocket field guide or a photo list of local birds and trees
- Headlamp for dawn and dusk sits, kept off while you sit
- Phone on silent, only for emergencies
- Binoculars (optional; use after you have settled)
If your spot is out of sight of houses, tell someone where you are and when you will be back, and keep your phone charged.
A weekly practice plan
Consistency matters more than length. This eight-week plan builds up one skill at a time. Visit two or three times a week; the first visit each week is the focus exercise and the others are free sitting with a short journal entry.
| Week | Focus exercise | Journal task |
|---|---|---|
| 1 | Choose the spot, sit 10–15 minutes, just settle | Date, weather, three things you noticed |
| 2 | Sit 20 minutes, note how long until birds sing again | Write the baseline in one line |
| 3 | Wide-angle vision and the finger test | Note what you noticed at the edge of view |
| 4 | Sound map #1 | Draw the map, list the 3 farthest sounds |
| 5 | Bird language: baseline and disturbance | Log every change in the pattern with the time |
| 6 | Wind test and fox walk to the spot | Note the wind direction on every visit |
| 7 | Dawn or dusk visit | Compare with a midday visit |
| 8 | Sound map #2 and review | Compare the two maps and write what you learned |
After eight weeks you will know your spot better than most people know their own street. Continue with a monthly deeper session, and add tracking and natural navigation to your outings. Browse more bushcraft skills for the next step.
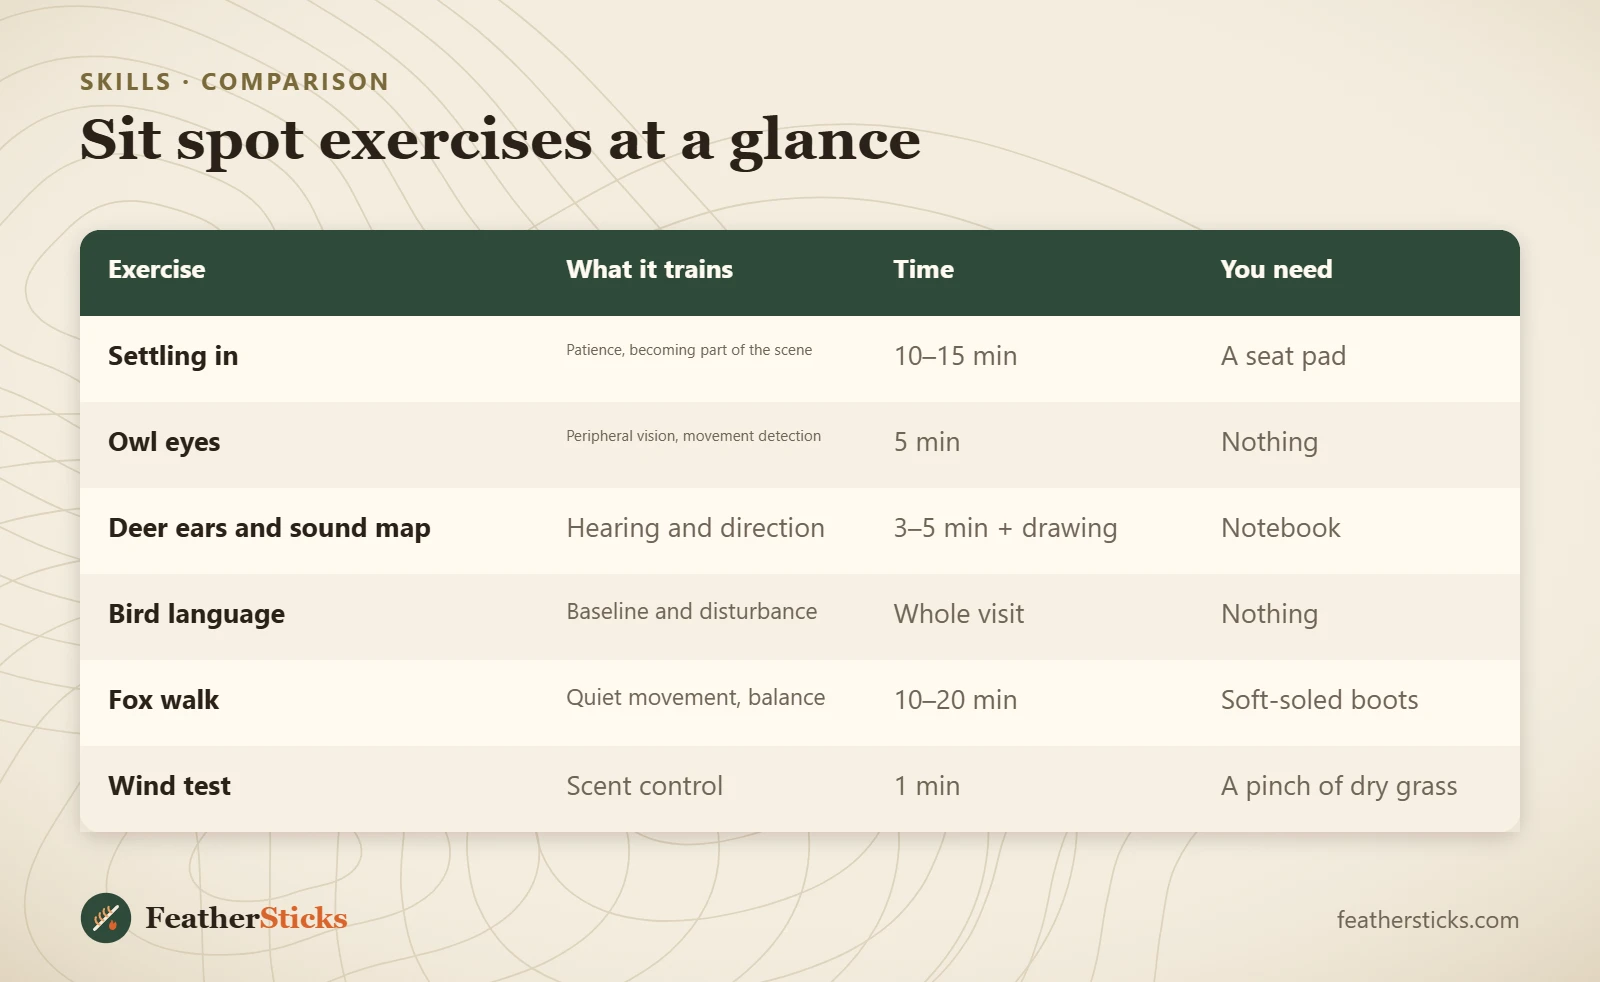
| Exercise | What it trains | Time | You need |
|---|---|---|---|
| Settling in | Patience, becoming part of the scene | 10–15 min | A seat pad |
| Owl eyes | Peripheral vision, movement detection | 5 min | Nothing |
| Deer ears and sound map | Hearing and direction | 3–5 min + drawing | Notebook |
| Bird language | Baseline and disturbance | Whole visit | Nothing |
| Fox walk | Quiet movement, balance | 10–20 min | Soft-soled boots |
| Wind test | Scent control | 1 min | A pinch of dry grass |
Common mistakes
- Choosing a spot too far away, so you rarely go.
- Sitting on or beside a game trail, near a den or near a nest.
- Dressing for the walk instead of for sitting still, and getting cold.
- Leaving after five minutes, before the birds have settled.
- Staring at one thing instead of using wide-angle vision.
- Treating an alarm call as proof instead of as a clue to follow with your eyes.
- Approaching animals for a photo, or feeding them to make them come.
- Skipping the journal, so changes between visits are lost.
What you need
- Foam seat pad
- Warm, quiet clothing in earth tones
- Notebook and pencil
- Small flask
- Pocket field guide for local birds and trees
- Headlamp for dawn and dusk visits
- Binoculars (optional)
FAQ
What is a sit spot?
How long should I sit?
How can I see more wildlife?
What is the fox walk?
What is wide-angle vision or owl eyes?
Can I do a sit spot in a city or garden?
How do bird alarm calls differ from song?
Is it okay to bring my dog?
Check yourself
Completed6 quick questions from this guide. Nothing is sent anywhere.
Related step-by-step guides
-
 1
-
 1
-
 1