Fire Plough & Fire Saw: Friction Fire Methods Beyond the Drill
A fire plough makes an ember by pushing a blunt stick hard and fast along a groove in a soft, dry board until the hot, dark dust piling up at the end of the groove smoulders into a coal. Its cousin, the fire saw, rubs a sharp wooden edge across a slit in a split piece of bamboo or wood until the dust falls through onto tinder and glows. Both are friction fire methods without a spindle, bow or cord.
They look simple and are hard work. Most people find them more tiring than the bow drill and at least as demanding on materials as the hand drill. This guide explains where the plough and saw sit among friction methods, how the groove and stick work, which European woods to use, what to do when bamboo is not available, how to pace your strokes, how to save the ember, and why a lighter stays in your pocket. For the wider picture see fire starting basics and our bushcraft guide for beginners.
Step by step
-
1

Find dry, soft, dead wood
Pick bone-dry, dead, non-resinous wood such as lime, willow or poplar for the board, and a dry stick of hazel or the same wood.
-
2

Carve board and plough stick
Split a board 40–60 cm long and 2–4 cm thick with a flat top. Carve a 25–40 cm stick about 2 cm thick with a blunt wedge tip.
-
3

Wear in the groove
Score a straight line and run the stick along it with light, slow strokes until a dark track 15–25 cm long forms.
-
4

Plough: long strokes, then faster
Kneel behind the board, hold the stick at 30–45° with both hands and push along the whole groove. Speed up and press harder as smoke builds.
-
5

Let the dust pile become an ember
When thick smoke rises from the dust pile at the end, stop and leave it for 10–30 seconds. Smoke from the pile itself means a coal.
-
6

Move it to tinder and blow
Tip the coal onto bark, slide it into a dry tinder bundle, fold it loosely and blow long, gentle breaths until it flames.
Fire plough and fire saw: where they sit among friction fire methods
Every friction fire works the same way: two pieces of dry wood rub against each other, the friction grinds them into fine dust and heats it, and when enough hot dust gathers in one insulated pile it starts to smoulder on its own. That smouldering pile is the ember. What differs between the methods is how the wood moves.
- Drills spin a spindle in a socket: the bow drill with a bow and cord, the hand drill between your palms.
- The fire plough pushes a stick back and forth along the grain of a board, in a groove. Dust is shoved forward and heaps at the end of the groove.
- The fire saw rubs an edge across a slit in a split piece of bamboo or wood. Dust falls through the slit onto tinder underneath.
- The fire thong pulls a strip of cane or cord back and forth under a split stick, a variation of the same idea.

| Method | Movement | Parts | Learning curve |
|---|---|---|---|
| Bow drill | Spindle spun by a bow and cord | Spindle, hearth, bearing block, bow, cord | The easiest friction method to learn |
| Hand drill | Spindle spun between the palms | Long light spindle, thin hearth | Hard: stamina, tough palms, special stalks |
| Fire plough | Stick pushed along a groove | Board, plough stick | Hard: very tiring, needs very dry wood |
| Fire saw | Edge rubbed across a slit | Split hearth, saw piece | Hard; easiest with dry bamboo, which is rare in Central Europe |
| Fire thong | Strip pulled under a split stick | Split stick, strip of cane or cord | Hard; the strip wears through quickly |
Why learn them at all?
The fire plough needs no cord and no carved socket, only a board, a stick and a knife. It shows you very clearly how pressure, speed and dust work together, because you can watch the groove darken and the pile grow stroke by stroke. The fire saw is the classic method in regions where large bamboo grows. For most people in Europe, though, both are skills to practise and enjoy, not methods to rely on. If you have never made a friction ember, start with the bow drill: it teaches what good dust and a real coal look like with far more margin for error.
How does a fire plough work?
A fire plough has only two parts: a hearth board with a straight groove on its top face, and a plough stick with a blunt, wedge-shaped tip that fits the groove. You hold the stick with both hands at a low angle, press its tip into the groove and push it forward and back along the groove, faster and faster.

Three things happen at once:
- The groove grinds dust. Under pressure the tip and the groove floor wear each other down into fine wood dust.
- The friction heats it. Fast, firm strokes make heat faster than it can escape into the board and the air.
- The dust collects in one pile. Each forward stroke shoves dust towards the far end of the groove, where it heaps up. A deep enough, hot enough pile insulates itself and begins to smoulder.
The pile at the end of the groove plays the role of the notch in a drill hearth: it is where the dust is kept together and where the coal is born. If the dust is scattered along the board or blown away, there is no ember, however hard you push.
The stick angle
Hold the stick at a low angle to the board, roughly 30–45° as a rule of thumb. Lower, and the tip skids out of the groove and your pressure goes forward instead of down. Steeper, and the tip digs in and stalls, and the strokes get short. Within that range, find the angle at which you can press hard and still push smoothly.
The best wood for a fire plough and fire saw in Europe
The rules are the same as for the drills: dead, bone-dry, non-resinous wood of soft to medium hardness. The plough is even less forgiving of damp wood than the bow drill, because each stroke spreads its heat along the whole groove instead of concentrating it in one socket.
Hearth board
The proven European choices are lime (linden), willow, poplar and aspen, the same woods recommended in the bow drill wood guide and the tree identification guide. Dead alder and thick dead ivy stems are also used. In North America, basswood, cottonwood and cedar fill the same role.
Plough stick
The stick is often made of the same wood as the board, or of a slightly harder wood so that the groove wears more than the tip. Straight, dead, dry hazel shoots are a good choice in Europe; dry dead elder also works, though it is not suitable for food contact. What matters most is that the stick is dry, straight enough to hold comfortably and not resinous.
| Wood | Use | Notes |
|---|---|---|
| Lime (linden) / basswood | Board, stick, fire saw | Classic soft friction wood; also sold as carving blanks. |
| Willow | Board, stick, fire saw | Reliable once fully dry; standing dead branches are ideal. |
| Poplar / aspen | Board, stick, fire saw | Soft and even; must be completely dry. |
| Alder, thick dead ivy | Board, stick | Soft, easy to carve; dry them well. |
| Hazel | Plough stick, saw piece | Straight shoots; dead and dry only. |
| Elder | Plough stick | Dry dead shoots only; not for food contact. |
| Pine, spruce, fir | Avoid | Resin glazes the groove; keep them for fatwood. |
| Oak, beech | Avoid | Too hard: smoke, almost no dust. |
Use dead wood only. Cutting living trees or branches usually needs the landowner's permission, and protected areas may forbid collecting anything.
The thumbnail test and the dry test
Press your thumbnail firmly into the board: a clear dent means the hardness is right, no mark means too hard, and crumbling means rotten. Then check dryness. Dead wood that lies on the ground soaks up moisture; standing dead wood, dead branches still on the tree, is usually much drier. If the outside is damp, split the piece and work from the dry core; see batoning.
Making a fire plough: board, groove and stick
A sharp knife is enough; a small saw and an axe or batoning make splitting the board easier. If you are new to knife work, practise the carving basics first, choose a sturdy bushcraft knife, and check the knife laws where you live before carrying one.
| Part | Size | Shape | Why |
|---|---|---|---|
| Hearth board | 40–60 cm long, 5–10 cm wide, 2–4 cm thick | Split, top face carved flat | Long enough to kneel behind and plough; thick enough not to crack. |
| Groove | 15–25 cm long, about as wide as the stick tip | Straight, along the grain | A long track for full strokes; ends before the board end so the dust can heap. |
| Plough stick | 25–40 cm long, about 2 cm thick | Straight, blunt wedge tip | Long enough for two hands; thick enough to press hard. |
| Stick angle | Roughly 30–45° to the board | Low, steady | Pressure goes into the groove instead of skidding or digging in. |
These are rules of thumb, not exact measurements. Adapt them to your wood and your body.
The board
Split a dry dead branch or small log in half and carve the split face flat, so the board lies steady without rocking. Leave the round side down. Choose a piece without knots along the line where the groove will run, because a knot stops the stick and hardens the groove.
The stick tip
Carve the tip into a blunt wedge, rounded at the very end, about as wide as the groove you want. A sharp point digs in and stalls; a flat, square end skids. The tip wears into the shape of the groove during the first strokes anyway.
Preparing the groove, step by step
 1Score a straight line
With the knife tip, scratch a straight line along the grain on the flat top, starting a hand width from your end and stopping a few centimetres before the far end. Cut away from your body on a stable surface.
 2Shape the tip
Carve the stick tip into a blunt wedge as wide as the groove should be. It must sit in the line without wobbling sideways.
 3Wear in with light strokes
Run the stick along the line with light, slow, full-length strokes. A pale track appears and slowly deepens. Do not push hard yet: you are shaping the track, not making an ember.
 4Check the groove and the end
A good groove is straight, dark brown to black and smooth, and the dust gathers at its far end on the flat board. If the dust spills over the sides, the groove is too shallow or crooked.
Fire plough technique: body position, strokes and pacing
Body position
- Lay the board on dry ground or on a layer of dry bark, groove up. In damp conditions, put a few dry sticks under it.
- Kneel behind the near end of the board, so the groove runs away from you. Some people sit astride the board or brace its near end against their knees; what matters is that the board does not slide.
- Hold the stick with both hands, one above the other, and lean your upper body over it. The pressure should come from your body weight, not only from your arms.
- Keep your back as straight as you can and your elbows slightly bent. Locked arms tire fast and make the strokes jerky.
Pacing: long strokes, then speed up
The plough rewards patience at the start and all-out effort at the end. Begin with long, even strokes over the whole groove to heat and dry the wood and to build up a pile of dust. Then, as smoke rises, shorten the strokes slightly, speed up and press harder, always ending each forward stroke at the dust pile.
Ploughing, stroke by stroke
 1Grip and angle
Both hands on the stick, tip in the groove at roughly 30–45°. Lean over the stick so your weight presses straight into the groove.
 2Long, even strokes
Push the tip along the whole groove and back in a steady rhythm. Keep the tip in the groove on the way back; lifting it scatters the dust.
 3Faster and harder at the end
When smoke appears and the pile grows dark, speed up and press harder. Many people shorten the stroke to the far half of the groove for this final burst.
 4Feed the pile
End every forward stroke at the dust pile so the tip shoves fresh hot dust into it. Do not ram through the pile and scatter it.
| Phase | Smoke | Groove and dust | Feel |
|---|---|---|---|
| Wear-in | None | Pale track, a few light grains | Smooth, light |
| Warm-up | A faint wisp | Track turns brown, dust starts to gather at the end | Even resistance |
| Build-up | Steady smoke from the groove | Dark groove, dark dust heaping up | Hard work; the tip bites |
| Final burst | Thick smoke from the pile | Black, fine dust in a firm heap | All-out effort, short and fast |
| After stopping | Smoke keeps rising from the pile itself | Pile holds together, dark core | A coal has formed |
Breathing and rests
Breathe out on the push and in on the return. Holding your breath tires you within seconds. The final burst is short and very hard; if you run out of strength before the pile smokes on its own, stop, rest a few minutes, and start again with a few warming strokes before the next burst. Repeated all-out attempts make you sweat, which chills you afterwards, so budget your energy.
The fire saw: split bamboo, split sticks and the cross-groove
The fire saw turns the plough around: instead of pushing along the grain, you rub an edge across the hearth. The classic hearth is a length of dry bamboo split in half. A narrow slit is cut across the convex side, right through the wall, and fine tinder is placed under or inside the hollow below the slit. A second piece with a blunt, bevelled edge is then sawn back and forth across the slit. The friction cuts a cross-groove, and the hot dust falls through the slit onto the tinder, where it can form an ember directly.
The fire saw, step by step
 1Split and slit
Split a dry piece of bamboo or a dry stick lengthwise. Cut a narrow slit across the convex side, through the wall of the bamboo or most of the way into the stick.
 2Tinder under the slit
Lay the hearth convex side up over a small pad of fine, dry tinder, or pack the tinder into the hollow of the bamboo. Fix the hearth between two stakes, under your knee or with a partner's help so it cannot move.
 3Saw across
Hold the saw piece at both ends and rub its edge back and forth across the slit with firm, even strokes. Start long and steady, then speed up as smoke appears.
 4Dust drops into the tinder
When the cross-groove cuts through, hot dust falls onto the tinder. Keep going a few more strokes, then let it rest and look for smoke rising from the tinder itself.
Bamboo in Central Europe: be honest
The fire saw is traditional where large bamboo grows naturally, in parts of South and South-East Asia, for example. In Central Europe, suitable bamboo is rare: garden bamboo is usually green, thin or protected as someone's property, and dry, thick-walled pieces are not something you will find in a forest. Bamboo sold as garden or craft material can be used for practice at home if it is completely dry, but you cannot count on it outdoors.
Split softwood alternatives
Without bamboo, a fire saw can be made from dry split wood: a dead lime, willow or poplar stick split in half, with the slit cut across the round side. Soft wood here means soft, non-resinous broadleaf wood, not resinous conifers. The saw piece can be a split board of the same wood or of hazel, with one edge carved to a blunt bevel. Expect it to be harder than with bamboo: the solid hearth needs a deeper cut before the dust can fall through, so many people cut the slit most of the way through first and place the tinder or an ember pan directly under it.
Fire plough vs fire saw
Fire plough
- Board and stick from common European woods
- Dust heaps on the board, ember is tipped into tinder
- Long groove, very tiring final burst
- Easy to see what is happening in the groove
Fire saw
- Easiest with dry split bamboo, rare in Central Europe
- Dust falls straight onto the tinder
- Hearth must be fixed firmly
- Split-stick version works but needs more effort
The fire thong in brief
The fire thong is a relative of the fire saw. A split stick lies on the ground, held down by your foot, with a little tinder or an ember pan under a slit. A strong, flexible strip, traditionally split rattan or cane, is passed under the stick and pulled up and down alternately with both hands, like a shoeshine cloth. The friction cuts a groove into the stick, and the dust falls through onto the tinder.
In Europe the fire thong is mostly a curiosity. Rattan is not a native plant, and most improvised strips of bark or natural cordage wear through or snap before an ember forms. Paracord tends to melt and glaze. If you want to try it, use a dry split lime or willow stick and a strip that is tough and dry, and treat it as an experiment rather than a method.
Ember care: from the dust pile to the tinder bundle
Prepare everything before you start ploughing: a dry tinder bundle about two fists in size, with a hollow in the middle, made of dry grass, shredded inner bark or other natural tinder; see how to build a tinder bundle. Have kindling such as feather sticks and a ready-built fire lay waiting. Once the ember exists, there is no time to collect anything.
From dust pile to flame
 1Stop and let it settle
Lift the stick away without knocking the board and leave the pile alone for 10–30 seconds. Shield it from wind with your body or hand.
 2Tip it onto bark
If the pile keeps smoking on its own, a coal has formed. Tilt the board so the coal slides onto a bark chip or ember pan at the board end. Do not poke it.
 3Slide it into the nest
Carry the bark to the tinder bundle and slide the coal into the hollow. If it crumbles, it needed a few more seconds.
 4Fold and blow
Fold the tinder loosely around the coal, hold it up with your back to the wind and blow long, gentle breaths, more as the smoke thickens and turns white.
An alternative is to hold the open tinder bundle against the end of the board and tip the coal straight into it, or to lift the pile on the flat of a knife blade. Whatever you do, move the board or the support, not the fragile coal with your fingers.
Extending a small ember
A plough ember is often small and loose. A piece of char cloth or charred punk wood placed against it takes the glow and makes it larger and more stable before it goes into the nest. This is optional, but it helps when the tinder is not perfect. The moment the tinder flames, set it under your fire lay and feed thin kindling. The fire lay picker suggests a lay for your weather, and the firewood calculator estimates how much wood to prepare.
Fire plough troubleshooting: polish, no smoke, coarse dust
The board tells you what is wrong. Look at the groove and the dust before you blame your strength.
| Symptom | Likely cause | Fix |
|---|---|---|
| Shiny, polished groove, little dust | Too much pressure too early, resinous or damp wood, a hard board | Scrape the shine off groove and tip, use a drier or softer board, restart with lighter, faster strokes. |
| No smoke at all | Wood damp or too hard, too little pressure or speed | Use drier, softer wood; lean your body weight into the stick; check the tip sits in the groove. |
| Smoke but coarse, pale dust | Tearing instead of grinding: too much pressure, too little speed, or wood too soft | More speed, a little less pressure; try a slightly harder or drier stick. |
| Dust spills over the groove sides | Groove too shallow, crooked or too wide; stick wobbling | Deepen and straighten the groove; narrow the tip; keep both hands steady. |
| Dark dust that does not hold together | Stopped too early, pile too small, wind or cold ground | Continue the final burst longer, shield the board, put dry bark underneath. |
| The pile is scattered | Tip lifted on the return or rammed through the pile | Keep the tip in the groove; stop each forward stroke at the pile. |
| A coal forms but crumbles | It had no time to consolidate | Wait the full 10–30 seconds; tip the board, do not touch the coal. |

Polish: the most common problem
A polished groove means the wood is being burnished instead of ground. It happens when you press hard before the groove is worn in, when the wood is resinous or damp, or when the board is too hard. Scrape both the groove and the tip back to fresh wood with the knife. A pinch of fine, dry sand in the groove can break the glaze, but if the board itself is the problem, choose a softer, drier one.
No smoke, or dust too coarse
No smoke at all almost always means damp wood or too little effort; on a humid day the plough may not work at all. Pale, coarse dust like sawdust means the wood is torn: speed up and ease off a little. Rub a pinch of cold dust between your fingers: good dust feels soft, almost greasy, and smears dark, just as described in the bow drill guide.
How hard is the fire plough? An honest look
The fire plough is hard. The final burst asks for a lot of strength and speed for a sustained stretch, and most beginners run out of energy just before the pile starts to smoulder. Expect many sessions before your first ember, even with good wood, and do not judge yourself by video clips of experienced people working with perfect, long-dried boards.
- Practise in dry conditions. A warm, dry summer day with wood that has been dried for weeks gives you the best chance. Fog, rain and damp autumn air make the method far harder.
- Learn the bow drill first. It teaches you what good dust and a real coal look like, with far more margin for error.
- Keep the kit dry. Store board and stick in a dry bag with your bushcraft kit, away from the ground.
- Always carry a backup. A lighter and a ferro rod in separate pockets weigh a few grams and work in seconds; our fire kit guide explains how to put a reliable kit together.
Protecting your hands: blisters and sore palms
The plough is rough on the hands. The stick rubs in your grip hundreds of times, and blisters on the palms and the base of the fingers come quickly, especially in the final burst. The fire saw rubs the same spots on both hands.
- Smooth the stick. Shave off bark, knots and rough spots where your hands hold it.
- Tape hot spots. A strip of athletic or medical tape on the base of the fingers and the heel of the palm helps. Thin work gloves are an option for the plough, because you grip the stick rather than spin it, as long as they do not slip.
- Short sessions. Stop at the first hot spot instead of ploughing into a blister.
- Treat blisters early and watch for splinters from the stick. See blisters and splinters in our first aid guide and carry a basic first aid kit.
Fire safety, fire bans and responsible practice
Fire bans and local rules
An ember is a fire. Rules about open fires differ widely between countries, regions and landowners; many forests, parks and reserves ban fires completely, especially in dry seasons, or allow them only at designated fire places. Ironically, the dry, warm days that suit the fire plough are often the days of high fire danger. Check the current fire danger level and local rules before you practise. This guide is general information, not legal advice.
Knife work and wood
Carve away from your body and keep your free hand behind the blade. Use only dead wood, and ask the landowner before taking any. Do not use unknown plants or wood, and avoid breathing smoke from material you cannot identify. For more fire skills, see our fire skills overview.
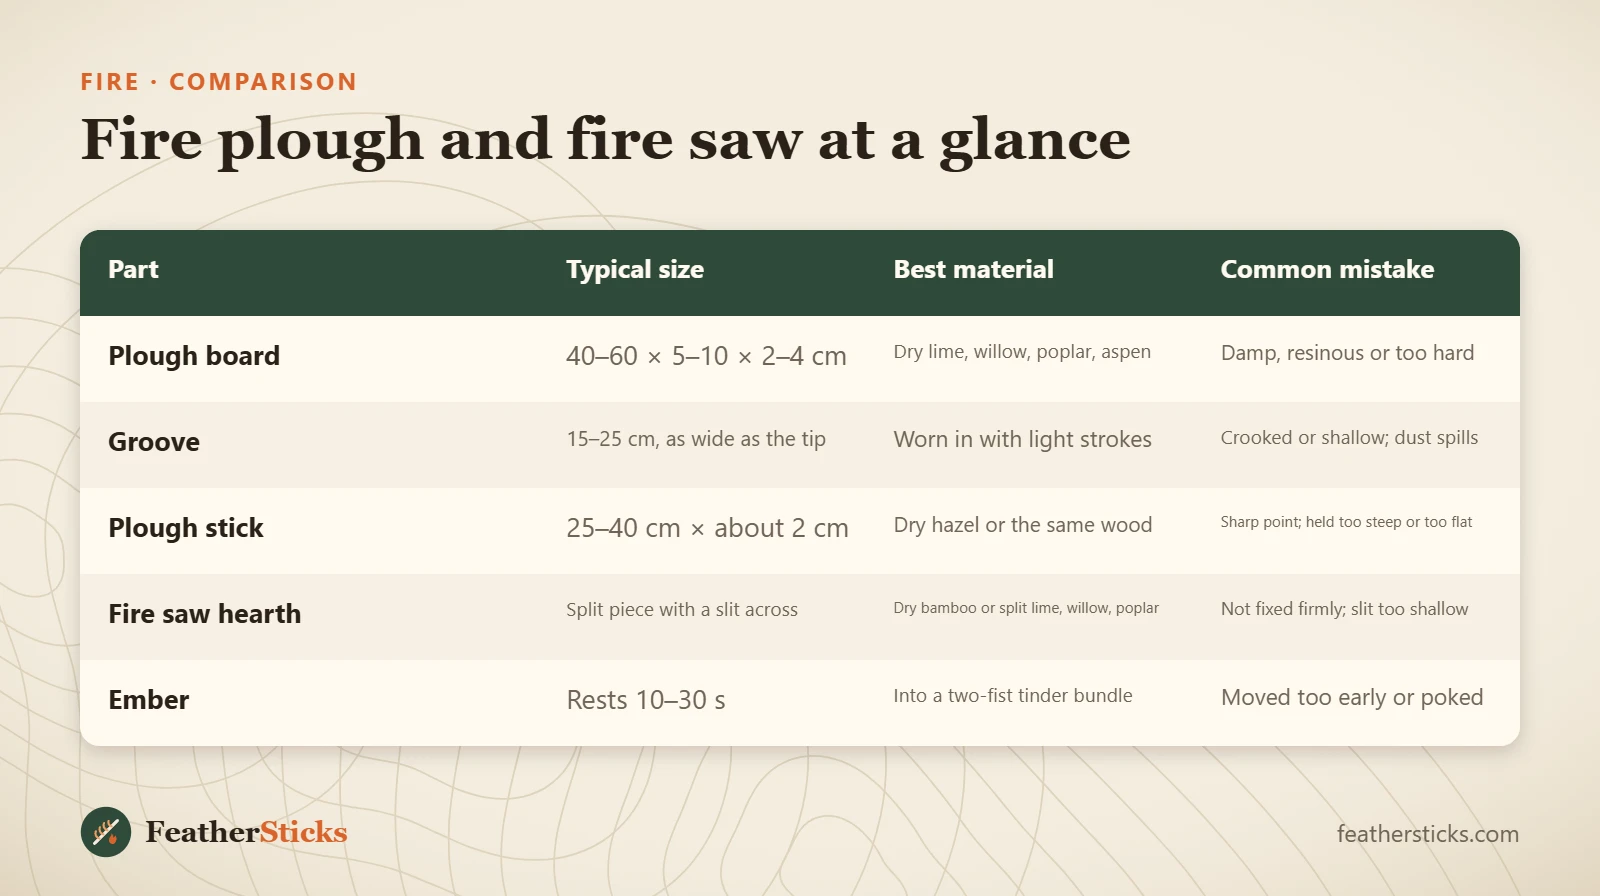
| Part | Typical size | Best material | Common mistake |
|---|---|---|---|
| Plough board | 40–60 × 5–10 × 2–4 cm | Dry lime, willow, poplar, aspen | Damp, resinous or too hard |
| Groove | 15–25 cm, as wide as the tip | Worn in with light strokes | Crooked or shallow; dust spills |
| Plough stick | 25–40 cm × about 2 cm | Dry hazel or the same wood | Sharp point; held too steep or too flat |
| Fire saw hearth | Split piece with a slit across | Dry bamboo or split lime, willow, poplar | Not fixed firmly; slit too shallow |
| Ember | Rests 10–30 s | Into a two-fist tinder bundle | Moved too early or poked |
Common mistakes
- Trying the fire plough before learning the bow drill.
- Using damp, resinous or hard wood, or wood picked up from the wet ground.
- Pressing hard before the groove is worn in, so it polishes.
- Lifting the tip on the return stroke and scattering the dust.
- Stopping the final burst just before the pile smokes on its own.
- Starting without a tinder bundle and kindling ready.
- Relying on friction fire instead of carrying a lighter and ferro rod.
What you need
- Fixed-blade bushcraft knife
- Dry hearth boards and a spare plough stick
- Bark chip or ember pan
- Dry tinder in a waterproof bag
- Char cloth to extend a small ember
- Athletic tape for hot spots
- Lighter and ferro rod as backup
- Water to put out the fire
FAQ
What is a fire plough?
Is the fire plough harder than the bow drill?
What wood is best for a fire plough?
At what angle should I hold the plough stick?
What is a fire saw and how does it work?
Can I make a fire saw without bamboo?
Why does my fire plough groove get shiny?
Should I carry a lighter if I practise friction fire?
Check yourself
Completed6 quick questions from this guide. Nothing is sent anywhere.
Related step-by-step guides
-
 1
-
 1
-
 1